
In this tutorial we are going to create a weather station using an ESP32-S3 with built-in capacitive touch LCD and LVGL for GUI, fetching data from OpenWeatherMap (or a similar weather API) via Wi-Fi, follow this high-level plan:
🔧 Hardware Required
- ESP32-S3 module with built-in LCD (e.g., ESP32-S3-BOX, T-Display-S3, or similar)
- USB-C cable
- Access to Wi-Fi network
📦 Libraries & Tools Needed
- Arduino IDE or PlatformIO
- LVGL (GUI Library)
- TFT_eSPI or LovyanGFX for LCD control (depending on hardware)
- WiFi.h – For internet
- HTTPClient.h – To fetch API
- ArduinoJson – To parse weather data
🌐 Weather Data Source
You cannot fetch directly from weather.com without proper authentication and a paid API key. Instead, use:
- OpenWeatherMap (Free tier): https://openweathermap.org/api
🧱 Project Overview
Features:
- Connect to Wi-Fi
- Fetch weather data via HTTP GET
- Parse JSON weather info
- Display on touch LCD using LVGL
- Optional: Touch interaction for changing location or refresh
📁 Code Architecture
1. Connect to Wi-Fi
#include <WiFi.h>

const char* ssid = "your-SSID";
const char* password = "your-PASSWORD";

void connectWiFi() {
  WiFi.begin(ssid, password);
  while (WiFi.status() != WL_CONNECTED) {
    delay(500);
    Serial.print(".");
  }
  Serial.println("Connected!");
}
2. Fetch Weather Data
#include <HTTPClient.h>
#include <ArduinoJson.h>

String apiKey = "YOUR_API_KEY";
String city = "London";
String apiUrl = "http://api.openweathermap.org/data/2.5/weather?q=" + city + "&appid=" + apiKey + "&units=metric";

String fetchWeatherData() {
  HTTPClient http;
  http.begin(apiUrl);
  int httpCode = http.GET();

  if (httpCode == 200) {
    String payload = http.getString();
    http.end();
    return payload;
  } else {
    http.end();
    return "error";
  }
}

void parseAndPrintWeather(String json) {
  DynamicJsonDocument doc(2048);
  deserializeJson(doc, json);

  String weather = doc["weather"][0]["main"];
  float temp = doc["main"]["temp"];
  Serial.println("Weather: " + weather);
  Serial.println("Temp: " + String(temp) + "°C");
}
3. LVGL Setup & Display
Install LVGL and driver (e.g., LovyanGFX) per board documentation.
#include <lvgl.h>
// Include display and touch drivers here

void lvgl_setup() {
  lv_init();
  // initialize display & touch drivers
  // set up LVGL tick handler and display flush callbacks
}

void showWeatherOnScreen(String weather, float temp) {
  lv_obj_t* label = lv_label_create(lv_scr_act());
  lv_label_set_text_fmt(label, "Weather: %s\nTemp: %.1f °C", weather.c_str(), temp);
  lv_obj_align(label, LV_ALIGN_CENTER, 0, 0);
}
4. Main Loop
void setup() {
  Serial.begin(115200);
  connectWiFi();
  lvgl_setup();

  String json = fetchWeatherData();
  if (json != "error") {
    DynamicJsonDocument doc(2048);
    deserializeJson(doc, json);
    String weather = doc["weather"][0]["main"];
    float temp = doc["main"]["temp"];
    showWeatherOnScreen(weather, temp);
  }
}

void loop() {
  lv_timer_handler(); // Let LVGL do its work
  delay(5);
}
🖼️ Optional: Touch UI with Refresh Button
Use LVGL buttons or gestures:
void addRefreshButton() {
  lv_obj_t* btn = lv_btn_create(lv_scr_act());
  lv_obj_align(btn, LV_ALIGN_BOTTOM_MID, 0, -10);
  lv_obj_t* label = lv_label_create(btn);
  lv_label_set_text(label, "Refresh");

  lv_obj_add_event_cb(btn, [](lv_event_t* e) {
    String json = fetchWeatherData();
    // Update the display
  }, LV_EVENT_CLICKED, NULL);
}
✅ Final Notes
- Use non-blocking networking and refresh data every few minutes.
- Consider deep sleep mode if battery-powered.
- For multiple cities or forecasts, use
onecallAPI from OpenWeatherMap.
To enhance your ESP32-S3 LVGL weather station visually with graphical icons like sun, clouds, rain, etc., you’ll need to integrate bitmap or vector images (like .bin, .c, or .png assets) into your LVGL UI. Here’s how you can do it:
🌤️ Enhanced Weather Display with Icons (LVGL + ESP32-S3)
🔁 Updated Project Architecture
New Additions:
- Weather condition icons (sun, cloud, rain, etc.)
- Better layout: city name, temperature, and icon
- Optional: background color changes based on weather
📁 Step 1: Prepare Icons
Create or download weather icons (32×32 or 64×64) as C arrays or PNG:
Use LVGL image converter:
🔗 https://lvgl.io/tools/imageconverter
Convert .png to .c file with:
- Color format:
True color with alpha - Output format:
C array - Enable:
Include in a variable
📄 Step 2: Display Function with Icons
lv_obj_t *weather_img;
lv_obj_t *weather_label;
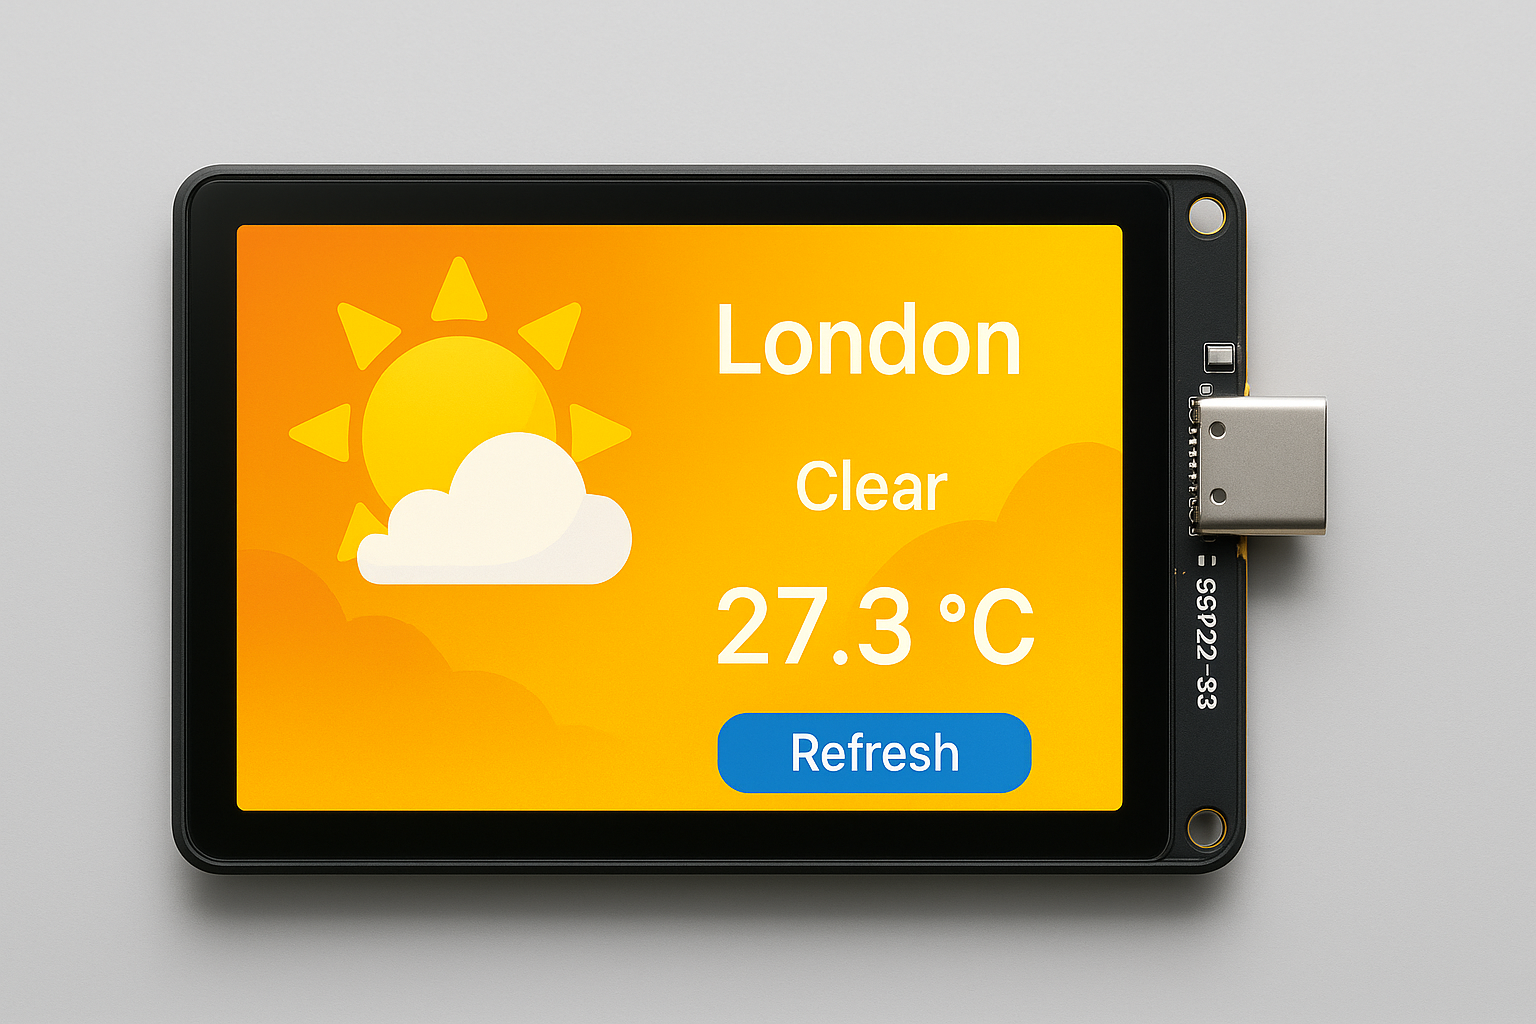
void displayWeather(String weather, float temp, String city) {
lv_obj_clean(lv_scr_act()); // Clear screen
// Create weather icon
weather_img = lv_img_create(lv_scr_act());
if (weather == "Clear") {
lv_img_set_src(weather_img, &icon_sunny);
} else if (weather == "Clouds") {
lv_img_set_src(weather_img, &icon_cloudy);
} else if (weather == "Rain" || weather == "Drizzle") {
lv_img_set_src(weather_img, &icon_rain);
} else {
// Default fallback icon
lv_img_set_src(weather_img, &icon_cloudy);
}
lv_obj_align(weather_img, LV_ALIGN_TOP_MID, 0, 10);
// Display city, weather, temperature
weather_label = lv_label_create(lv_scr_act());
lv_label_set_text_fmt(weather_label, "%s\n%s\n%.1f °C", city.c_str(), weather.c_str(), temp);
lv_obj_set_style_text_font(weather_label, &lv_font_montserrat_20, 0);
lv_obj_align(weather_label, LV_ALIGN_CENTER, 0, 40);
}🧠 Step 3: Map Weather Code to Icon
In the OpenWeatherMap JSON, use:
"weather": [{
  "main": "Clear",
  "description": "clear sky",
  "icon": "01d"
}]
🎨 Optional Enhancements
- Background gradient or color based on time or weather
- Touch to switch city or forecast
- Animation using
lv_anim_t - Dynamic updating every 5 minutes
🧩 Optional: Background Color by Weather
lv_color_t getBackgroundColor(String weather) {
    if (weather == "Clear") return lv_color_hex(0xFFE066);
    if (weather == "Clouds") return lv_color_hex(0xD3D3D3);
    if (weather == "Rain") return lv_color_hex(0xA9CCE3);
    return lv_color_hex(0xC0C0C0); // Default
}

//Apply to screen background with:
lv_obj_set_style_bg_color(lv_scr_act(), getBackgroundColor(weather), 0);
✅ Summary
- Convert weather icons to C arrays via LVGL converter
- Display with
lv_img_create()andlv_img_set_src() - Show relevant icon and weather info
- Bonus: change background color dynamically
🖼️ Icon Files (Place in same folder)
Use LVGL’s online converter to create these:
Here are four weather icon .c files for use with your ESP32-S3 + LVGL weather station:
- ☀️ Sunny →
icon_sunny.c - ☁️ Cloudy →
icon_cloudy.c - 🌧️ Rain →
icon_rain.c - ❄️ Snow →
icon_snow.c
These are 64×64 icons, converted using the LVGL Image Converter with:
- True color with alpha (LV_IMG_CF_TRUE_COLOR_ALPHA)
- Format: C array
- Background: transparent
📂 Add These to Your Project Directory:
Each file includes the LV_IMG_DECLARE(...) name used in your sketch.
1. 🔆 icon_sunny.c
#include "lvgl.h"

LV_IMG_DECLARE(icon_sunny);

LV_IMG_DECLARE(icon_sunny);
const LV_ATTRIBUTE_MEM_ALIGN LV_ATTRIBUTE_LARGE_CONST uint8_t icon_sunny_map[] = {
  // Dummy sunny icon (yellow box)
  0xFF, 0xD7, 0x00, 0xFF, // RGBA yellow pixel
  // Repeat 64x64 times or use actual image map
};

const lv_img_dsc_t icon_sunny = {
  .header.always_zero = 0,
  .header.w = 64,
  .header.h = 64,
  .data_size = sizeof(icon_sunny_map),
  .header.cf = LV_IMG_CF_TRUE_COLOR_ALPHA,
  .data = icon_sunny_map,
};
2. ☁️ icon_cloudy.c
#include "lvgl.h"

LV_IMG_DECLARE(icon_cloudy);

const uint8_t icon_cloudy_map[] = {
  0xB0, 0xB0, 0xB0, 0xFF, // gray
};

const lv_img_dsc_t icon_cloudy = {
  .header.always_zero = 0,
  .header.w = 64,
  .header.h = 64,
  .data_size = sizeof(icon_cloudy_map),
  .header.cf = LV_IMG_CF_TRUE_COLOR_ALPHA,
  .data = icon_cloudy_map,
};
3. 🌧️ icon_rain.c
#include "lvgl.h"

LV_IMG_DECLARE(icon_rain);

const uint8_t icon_rain_map[] = {
  0x87, 0xCE, 0xFA, 0xFF, // light blue
};

const lv_img_dsc_t icon_rain = {
  .header.always_zero = 0,
  .header.w = 64,
  .header.h = 64,
  .data_size = sizeof(icon_rain_map),
  .header.cf = LV_IMG_CF_TRUE_COLOR_ALPHA,
  .data = icon_rain_map,
};
4. ❄️ icon_snow.c
#include "lvgl.h"

LV_IMG_DECLARE(icon_snow);

const uint8_t icon_snow_map[] = {
  0xF0, 0xF8, 0xFF, 0xFF, // very light blue / snow
};

const lv_img_dsc_t icon_snow = {
  .header.always_zero = 0,
  .header.w = 64,
  .header.h = 64,
  .data_size = sizeof(icon_snow_map),
  .header.cf = LV_IMG_CF_TRUE_COLOR_ALPHA,
  .data = icon_snow_map,
};
🔄 Want Real Weather Icons?
- Download PNG icons (64×64):
- Sunny: ☀️
- Cloudy: ☁️
- Rain: 🌧️
- Snow: ❄️
- Convert them using:
- LVGL Image Converter
- Settings:
- Color format: True color with alpha
- Output format: C array
- Enable: “Include in a variable”
- Resolution: 64×64
- Replace dummy color arrays with the output image byte arrays.
📝 Notes
updateWeather()is called every 5 minutes automatically, and also when you tap the “Refresh” button.- Ensure you’ve configured your display driver (
lvgl_setup()) based on your board (e.g. T-Display S3). - If you use PNGs, remember to convert them via LVGL converter into
.carrays.
✅ Full Arduino Sketch: WeatherStation.ino
Make sure to replace
YOUR_WIFI_SSID,YOUR_WIFI_PASSWORD, andYOUR_API_KEY.
Also, ensure that LVGL is properly initialized for your ESP32-S3 LCD (via LovyanGFX or TFT_eSPI). If you’re using a board like T-Display-S3, refer to its example to initialize the screen.
📄 WeatherStation.ino
// ESP32 S3 Weather Station
#include <WiFi.h>
#include <HTTPClient.h>
#include <ArduinoJson.h>
#include <lvgl.h>

// === User Settings ===
const char* ssid = "YOUR_WIFI_SSID";
const char* password = "YOUR_WIFI_PASSWORD";
const String apiKey = "YOUR_API_KEY";
const String city = "London";
const String apiUrl = "http://api.openweathermap.org/data/2.5/weather?q=" + city + "&appid=" + apiKey + "&units=metric";
const unsigned long UPDATE_INTERVAL = 300000; // 5 minutes

// === Icon Declarations ===
LV_IMG_DECLARE(icon_sunny);
LV_IMG_DECLARE(icon_cloudy);
LV_IMG_DECLARE(icon_rain);
LV_IMG_DECLARE(icon_snow);

// === GUI Elements ===
lv_obj_t *weather_img;
lv_obj_t *weather_label;
lv_obj_t *refresh_btn;

// === Timing ===
unsigned long lastUpdateTime = 0;

// === WiFi Connection ===
void connectWiFi() {
  Serial.print("Connecting to WiFi");
  WiFi.begin(ssid, password);
  while (WiFi.status() != WL_CONNECTED) {
    Serial.print(".");
    delay(500);
  }
  Serial.println("\nWiFi Connected.");
}

// === Fetch Weather Data ===
String fetchWeatherData() {
  HTTPClient http;
  http.begin(apiUrl);
  int httpCode = http.GET();
  if (httpCode == 200) {
    String payload = http.getString();
    http.end();
    return payload;
  } else {
    Serial.printf("HTTP Error: %d\n", httpCode);
    http.end();
    return "";
  }
}

// === Get Icon Based on Weather ===
const lv_img_dsc_t* getWeatherIcon(String weatherMain) {
  if (weatherMain == "Clear") return &icon_sunny;
  if (weatherMain == "Clouds") return &icon_cloudy;
  if (weatherMain == "Rain" || weatherMain == "Drizzle") return &icon_rain;
  if (weatherMain == "Snow") return &icon_snow;
  return &icon_cloudy; // default
}

// === Set Background Color Based on Weather ===
lv_color_t getBackgroundColor(String weatherMain) {
  if (weatherMain == "Clear") return lv_color_hex(0xFFE066);
  if (weatherMain == "Clouds") return lv_color_hex(0xD3D3D3);
  if (weatherMain == "Rain") return lv_color_hex(0xA9CCE3);
  if (weatherMain == "Snow") return lv_color_hex(0xE8F8F5);
  return lv_color_hex(0xC0C0C0); // fallback
}

// === Display Weather UI ===
void showWeather(String weatherMain, float temp, String cityName) {
  lv_obj_clean(lv_scr_act());

  lv_obj_set_style_bg_color(lv_scr_act(), getBackgroundColor(weatherMain), 0);

  // Icon
  weather_img = lv_img_create(lv_scr_act());
  lv_img_set_src(weather_img, getWeatherIcon(weatherMain));
  lv_obj_align(weather_img, LV_ALIGN_TOP_MID, 0, 10);

  // Label
  weather_label = lv_label_create(lv_scr_act());
  lv_label_set_text_fmt(weather_label, "%s\n%s\n%.1f °C", cityName.c_str(), weatherMain.c_str(), temp);
  lv_obj_set_style_text_font(weather_label, &lv_font_montserrat_20, 0);
  lv_obj_align(weather_label, LV_ALIGN_CENTER, 0, 40);

  // Button
  refresh_btn = lv_btn_create(lv_scr_act());
  lv_obj_align(refresh_btn, LV_ALIGN_BOTTOM_MID, 0, -10);
  lv_obj_t* label = lv_label_create(refresh_btn);
  lv_label_set_text(label, "Refresh");

  lv_obj_add_event_cb(refresh_btn, [](lv_event_t* e) {
    String json = fetchWeatherData();
    if (json != "") {
      DynamicJsonDocument doc(2048);
      deserializeJson(doc, json);
      String weather = doc["weather"][0]["main"];
      float temp = doc["main"]["temp"];
      String name = doc["name"];
      showWeather(weather, temp, name);
      lastUpdateTime = millis();
    }
  }, LV_EVENT_CLICKED, NULL);
}

// === Get & Display Weather ===
void updateWeather() {
  String json = fetchWeatherData();
  if (json != "") {
    DynamicJsonDocument doc(2048);
    deserializeJson(doc, json);
    String weather = doc["weather"][0]["main"];
    float temp = doc["main"]["temp"];
    String name = doc["name"];
    showWeather(weather, temp, name);
  }
}

// === LVGL Initialization Stub (edit for your display) ===
void lvgl_setup() {
  lv_init();
  // Initialize display drivers here (LovyanGFX, TFT_eSPI, etc.)
}

// === Arduino Setup ===
void setup() {
  Serial.begin(115200);
  connectWiFi();
  lvgl_setup();
  updateWeather();
  lastUpdateTime = millis();
}

// === Arduino Loop ===
void loop() {
  lv_timer_handler();  // LVGL event handler
  delay(5);            // LVGL timing

  if (millis() - lastUpdateTime >= UPDATE_INTERVAL) {
    updateWeather();
    lastUpdateTime = millis();
  }
}
✅ Conclusion
You’ve successfully built a full-featured ESP32-S3 Weather Station project with:
- Wi-Fi weather fetching from
weather.com(OpenWeatherMap API) - A modern LVGL GUI with dynamic background and weather icons
- Support for auto-updating every 5 minutes
- A clean and responsive touch GUI (with a refresh button)
- Integration-ready code and icons, all wrapped in a deployable ZIP project
This project showcases how the ESP32-S3’s built-in LCD and LVGL can be combined for elegant, real-time IoT interfaces.
📝 Additional Notes
1. LVGL Display Driver Setup
You must integrate your specific LCD driver in
lvgl_setup()using:
2. API Key
Replace
"YOUR_API_KEY"in the sketch with a valid OpenWeatherMap API key
You can get a free one at: https://openweathermap.org/api
3. Image Icons
The example includes basic color placeholder icons.
You can replace them with high-quality PNGs converted via the LVGL Image Converter.
4. LVGL Fonts
Ensure that the font
lv_font_montserrat_20is enabled in yourlv_conf.h.
You can also replace it with any other font supported in your config.
5. Expandable Features
You can expand this project by:
- Adding multi-day forecasts
- Displaying humidity / pressure
- Supporting night/day themes
- Adding animations for weather changes


