

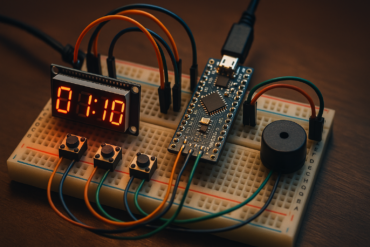
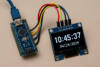
To build a clock using an Arduino Nano and a 0.96″ OLED display (typically SSD1306), you’ll also need a Real Time Clock (RTC) module like the DS3231 for accurate timekeeping. Here’s how to do it.
An Arduino Nano OLED clock offers several benefits, especially for hobbyists, students, and embedded developers. Here’s a breakdown of its practical, educational, and functional advantages:
✅ Benefits of an Arduino Nano + OLED Clock
1. Compact & Portable
- The Arduino Nano and 0.96″ OLED are small and lightweight.
- Perfect for portable clocks, desk setups, or wearables.
2. Low Power Consumption
- Efficient components mean it can run on battery power for extended periods.
- Especially useful in off-grid or mobile applications.
3. Customizable Interface
- You can design your own clock face (digital, analog, minimal, fancy).
- Add features like alarms, temperature, weather, or animations.
4. Educational Value
- Learn how to use:
- I²C communication (OLED and RTC)
- Real-Time Clock modules (DS3231)
- Timekeeping, graphics rendering, and microcontroller programming
- Great for beginners and students to understand embedded systems.
5. Reliable Timekeeping
- The DS3231 RTC module is temperature-compensated and highly accurate.
- Keeps time even when the Arduino loses power (has onboard battery backup).
6. Expandable
- Easily add sensors (e.g., DHT22 for humidity/temperature) or modules (e.g., WiFi for NTP sync).
- Can evolve into a smart clock or part of a home automation system.
7. Cost-Effective
- All components are inexpensive and widely available.
- Great project for less than $10–15.
8. Standalone Operation
- Once programmed, it doesn’t need a computer to run.
- Plug into USB power, and it works instantly.
9. Fun and Rewarding
- DIY electronics projects give a sense of accomplishment.
- You end up with a practical device that you built yourself.
🧰 Components Needed:
- Arduino Nano
- 0.96″ OLED display (I2C, SSD1306)
- DS3231 RTC module
- Jumper wires
- Breadboard (optional)
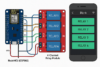
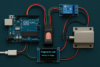
🔌 Wiring:
| Module | OLED Pin | Arduino Nano | RTC Pin | Arduino Nano |
|---|---|---|---|---|
| OLED | VCC | 3.3V or 5V | VCC | 5V |
| OLED | GND | GND | GND | GND |
| OLED | SDA | A4 | SDA | A4 |
| OLED | SCL | A5 | SCL | A5 |
Here are the required libraries for the Arduino Nano + 0.96″ OLED + DS3231 clock project:
📝 Notes:
- These libraries are actively maintained and work well together.
- Make sure you have the latest version of the Arduino IDE for compatibility.
✅ Required Libraries (Install via Library Manager):
- Adafruit SSD1306
- Author: Adafruit
- Purpose: To control the 0.96″ OLED display
- Install:
- Go to Sketch > Include Library > Manage Libraries
- Search for “Adafruit SSD1306”
- Install the latest version
- Adafruit GFX Library
- Author: Adafruit
- Purpose: Core graphics library required by SSD1306
- Install:
- In the Library Manager, search “Adafruit GFX”
- Install it
- RTClib
- Author: Adafruit
- Purpose: To interface with the DS3231 RTC module
- Install:
- Search for “RTClib”
- Install the one by Adafruit
🧠 Arduino Code:
#include <Wire.h>
#include <Adafruit_GFX.h>
#include <Adafruit_SSD1306.h>
#include <RTClib.h>

#define SCREEN_WIDTH 128
#define SCREEN_HEIGHT 64
#define OLED_RESET -1
Adafruit_SSD1306 display(SCREEN_WIDTH, SCREEN_HEIGHT, &Wire, OLED_RESET);

RTC_DS3231 rtc;

void setup() {
  Wire.begin();
  display.begin(SSD1306_SWITCHCAPVCC, 0x3C);
  display.clearDisplay();
  display.setTextColor(SSD1306_WHITE);
  display.setTextSize(2);
  display.setCursor(0,0);
  display.println("Starting...");
  display.display();

  if (!rtc.begin()) {
    display.clearDisplay();
    display.setCursor(0,0);
    display.println("RTC error!");
    display.display();
    while (1);
  }

  if (rtc.lostPower()) {
    rtc.adjust(DateTime(F(__DATE__), F(__TIME__))); // sets time to compile time
  }
}

void loop() {
  DateTime now = rtc.now();
  display.clearDisplay();

  display.setTextSize(2);
  display.setCursor(0, 10);
  display.printf("%02d:%02d:%02d", now.hour(), now.minute(), now.second());

  display.setTextSize(1);
  display.setCursor(0, 40);
  display.printf("%02d/%02d/%04d", now.day(), now.month(), now.year());

  display.display();
  delay(1000);
}
✅ Optional Add-ons:
- Add buttons to set the time.
- Use
millis()for smoother display updates withoutdelay(). - Add temperature display from DS3231 (
rtc.getTemperature()).
✅ Updated Code Using millis() Instead of delay()
Replacing delay(1000) with millis() is a great idea for smoother performance and to allow other tasks to run in parallel. Here’s how you can update your Arduino Nano OLED Clock code to use millis() instead of delay():
#include <Wire.h>
#include <Adafruit_GFX.h>
#include <Adafruit_SSD1306.h>
#include <RTClib.h>

#define SCREEN_WIDTH 128
#define SCREEN_HEIGHT 64
#define OLED_RESET -1
Adafruit_SSD1306 display(SCREEN_WIDTH, SCREEN_HEIGHT, &Wire, OLED_RESET);

RTC_DS3231 rtc;

unsigned long previousMillis = 0;
const long interval = 1000; // 1 second

void setup() {
  Wire.begin();
  display.begin(SSD1306_SWITCHCAPVCC, 0x3C);
  display.clearDisplay();
  display.setTextColor(SSD1306_WHITE);
  display.setTextSize(2);
  display.setCursor(0, 0);
  display.println("Starting...");
  display.display();

  if (!rtc.begin()) {
    display.clearDisplay();
    display.setCursor(0, 0);
    display.println("RTC error!");
    display.display();
    while (1);
  }

  if (rtc.lostPower()) {
    rtc.adjust(DateTime(F(__DATE__), F(__TIME__))); // Set to compile time
  }
}

void loop() {
  unsigned long currentMillis = millis();

  if (currentMillis - previousMillis >= interval) {
    previousMillis = currentMillis;

    DateTime now = rtc.now();
    display.clearDisplay();

    display.setTextSize(2);
    display.setCursor(0, 10);
    display.printf("%02d:%02d:%02d", now.hour(), now.minute(), now.second());

    display.setTextSize(1);
    display.setCursor(0, 40);
    display.printf("%02d/%02d/%04d", now.day(), now.month(), now.year());

    display.display();
  }

  // You can add more code here that runs continuously without being blocked by delay
}
✅ Benefits of Using millis():
- Non-blocking code execution
- Smooth integration of sensors, buttons, or other tasks
- Better for multitasking and responsive projects


